
 679665
Performing a Mail Merge is a great way to generate personalized letters or emails.
There are three documents involved in the mail merge process:
- Your main document
- Your data source
- Your merged document
NOTE: New Outlook only partially supports mail merge. It is recommended to use classic outlook with these instructions. Also, the examples shown below contain sample screen shots from Microsoft Word 2016. If you have a different version of Word, there may be some slight differences however, the same basic program flow should apply.
Step 1: Create your Excel Spreadsheet
The most important step in the mail merge process is to set up and prepare your data. You’ll use your Excel spreadsheet as the data source for your recipient list.
Here are some tips to prepare your data for a mail merge:
- Make sure the column names on your spreadsheet match the field names you want to insert in your mail merge
- All data to be merged is present in the first sheet of your spreadsheet
- All data entries with percentages, currencies, and zip codes are correctly formatted in the spreadsheet so that Word can properly read their values
- The Excel spreadsheet to be used in the mail merge is stored on your local computer
- Changes or additions to your spreadsheet are completed before it’s connected to your mail merge document in Word
Step 2: Create a mail merge document
When creating a mail merge you have the ability to use an existing document/letter.
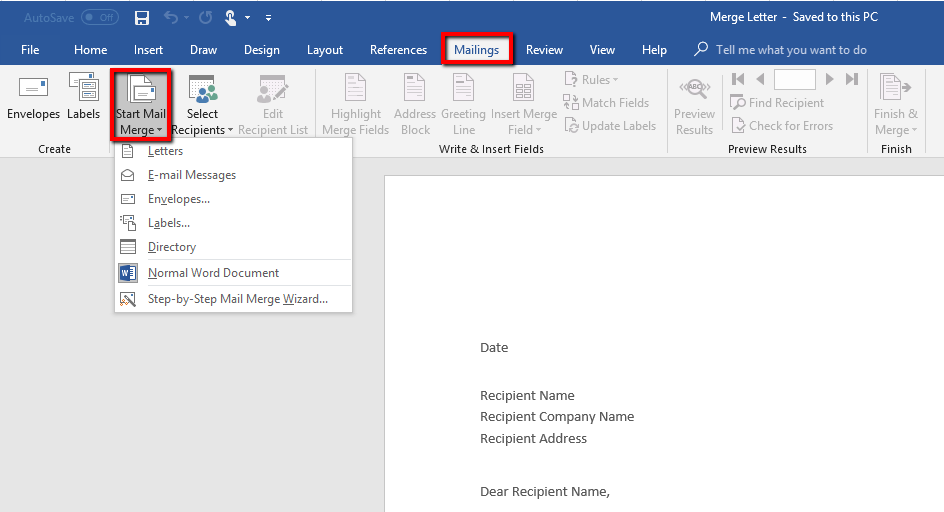
In Word, open the existing file and press the ‘Mailings’ tab in the main menu.
On the Mailings tab, choose the ‘Start Mail Merge’ button, a list of different types of documents will drop down (i.e. Letters, E-mail Messages, etc.). choose the kind of merge you want to run.
Now choose the ‘Select Recipients’ button and choose ‘Use an Existing List’
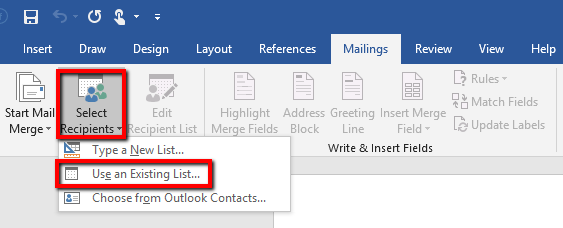
Browse to find your Excel spreadsheet you previously saved, and then choose ‘OK’.
NOTE: Now the Excel spreadsheet is connected to the mail merge document you’re creating in Word.
Step 3: Inserting the merge fields
You will notice menu items are now active that were not previously
You can insert one or more mail merge fields that pull the information from your spreadsheet into your document.
On your Word document, highlight the field you want to populate with the data from Excel.
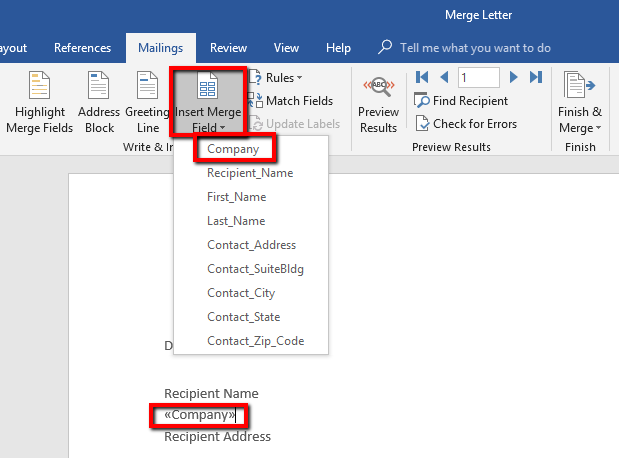
On the Mailings tab, choose the ‘Insert Merge Field’ button, a list of the column headers on your saved excel document will drop down (i.e. Company Name, etc.). Choose the appropriate field you want to merge and choose Insert.
The highlighted field will be replaced with the merge field (i.e. «Company», etc.)
Repeat step 3 for each of the fields you want to merge and choose Close when done.
Now choose ‘Save’.
Step 4: Previewing the mail merge
After you insert the merge fields you want you can now preview the results to confirm that the document is set-up the way you want.
On the Mailings tab, choose ‘Preview Results’. The merge fields will be populated with the data on the first row of your excel document.
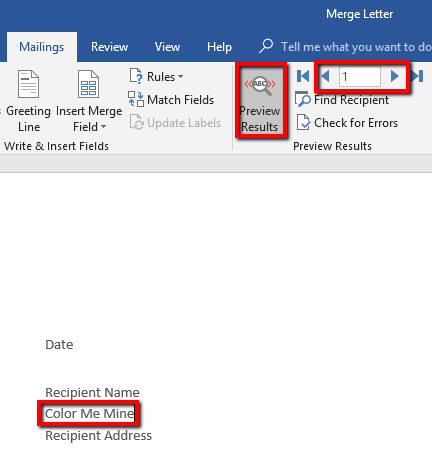
To move through the records in your data source and view how they will appear in the document choose the right arrow to advance or the left arrow for the previous record.
Step 5: Merging and Saving your mail merge
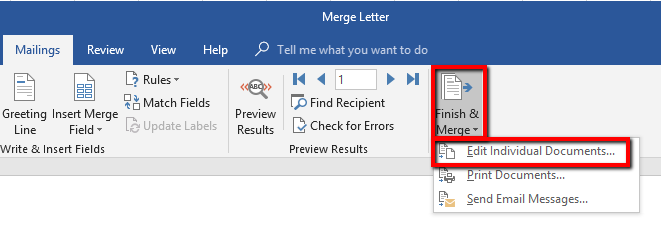
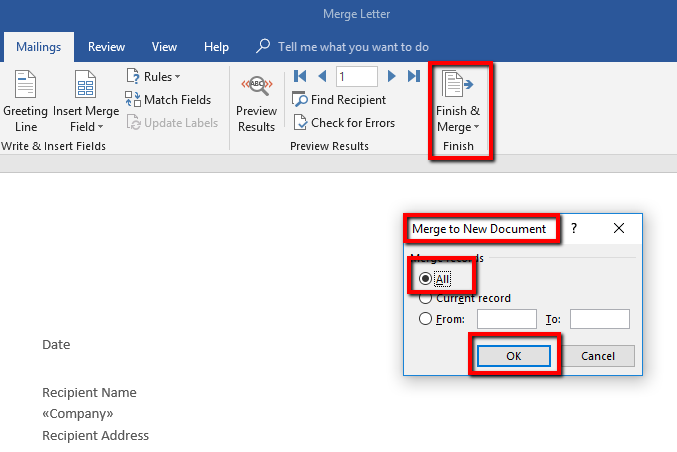
On the Mailings tab, choose the ‘Finish & Merge’ button, a list of different types of merges will drop down (i.e. Edit Individual Documents, Print Documents and Send Email Messages) choose ‘Edit Individual Documents’. A ‘Merge to New Document’ pop-up box will appear, choose ‘OK’.
You will now have a separate letter for each of the rows on the excel document which you can print, email, etc.
Step 6: Saving your mail merge document
When you are done working with your merged documents, save and close it as you would any other Word document. Once closed the mail merge template will still be open. If you plan to reuse it in the future, save it and it will stay connected to your data source.
NOTE: A mail merge can just as easily be an email merge. Add a column to your excel spreadsheet that contains the email address to send each merged letter to. Under 'Finish and Merge', select 'Send Email Messages' and for the TO specify the column name that contains the email address and specify the SUBJECT to use.

