
 4305
4305
Create an email signature in Outlook Web
- Login to Outlook Web at https://mail.office365.com
- Go to Settings
 > View all Outlook settings > Compose and reply.
 - Under Email signature, type your signature and use the available formatting options to change its appearance.
Note: You can have only one signature per account.
-
- If you want your signature to appear at the bottom of all new email messages that you compose, select the Automatically include my signature on new messages I compose check box.
- If you want your signature to appear on messages that you forward or reply to, select the Automatically include my signature on messages I forward or reply to check box.
- If you don’t select these options, you can manually add your signature to a selected message, just select Insert signature at the bottom of the compose pane.
- Select Save when you're done.
Note: You can always return to the Compose and reply page and select or clear the check box for automatically including your signature.
---
Create an email signature in Outlook Desktop
Compose a new email message.
-
On the Message menu, select Signature > Signatures.
Depending on the size of your Outlook window and whether you're composing a new email message or a reply or forward, the Message menu and the Signature button might be in two different locations.


-
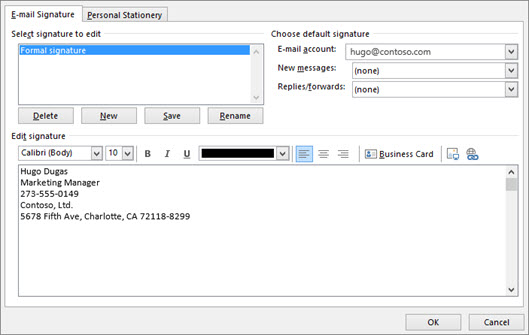
Under Select signature to edit, choose New, and in the New Signature dialog box, type a name for the signature.
-
Under Edit signature, compose your signature. You can change fonts, font colors, and sizes, as well as text alignment. If you want to create a more robust signature with bullets, tables, or borders, use Word to format your text, then copy and paste the signature into the Edit signature box. You can also use one of our pre-designed templates for your signature. Download the templates in Word, customize them with your personal information, and then copy and paste them into the Edit signature box.
Notes:-
You can add links and images to your email signature, change fonts and colors, and justify the text using the mini formatting bar under Edit signature.
-
You can also add social media icons and links in your signature or customize one of our pre-designed temlates. For more information, see Create a signature from a template.
-
To add images to your signature, see Add a logo or image to your signature.
-
-
Under Choose default signature, set the following options for your signature:
In the E-mail account drop-down box, choose an email account to associate with the signature. You can have different signatures for each email account.
If you want your signature added to all new messages by default, in the New messages drop-down box, select one of your signatures. If you don't want to automatically add a signature to new messages, choose (none). This doesn't add a signature to any messages you reply to or forward.
If you want your signature to appear in the messages you reply to and forward, in the Replies/forwards drop-down, select one of your signatures. Otherwise, accept the default option of (none).
-
Choose OK to save your new signature and return to your message. Outlook doesn't add your new signature to the message you opened in Step 1, even if you chose to apply the signature to all new messages. You'll have to add the signature manually to this one message. All future messages will have the signature added automatically. To add the signature manually, select Signature from the Message menu and then pick the signature you just created.
Add a logo or image to your signature
If you have a company logo or an image to add to your signature, use the following steps.
-
Open a new message and then select Signature > Signatures.
-
In the Select signature to edit box, choose the signature you want to add a logo or image to.
-
Select the Image icon
 , locate your image file, and select Insert.
 -
To resize your image, right-click the image, then choose Picture. Select the Size tab and use the options to resize your image. To keep the image proportions, make sure to keep the Lock aspect ratio checkbox checked.
-
When you're done, select OK, then select OK again to save the changes to your signature.
Insert a signature manually
If you don't choose to insert a signature for all new messages or replies and forwards, you can still insert a signature manually.
-
In your email message, on the Message tab, select Signature.
-
Choose your signature from the fly-out menu that appears. If you have more than one signature, you can select any of the signatures you've created.

